One Hour Dinner Rolls

I love bread.

I love the heavenly aroma, the fluffy texture, and the perfect taste in-between bites of a great meal. But some recipes call for multiple rises lasting several hours, and making bread can quickly become an all-day ordeal that definitely needs to be planned well in advance.

Several times, I have been making dinner and would have loved a bread roll to complete the meal, but had to find something else because of the intense time needed for loaves of bread.

Then I found this recipe from What is on Your Menu This Week for bread rolls that takes just under an hour. I was ecstatic! So including three inactive resting phases, this bread barely takes an hour to make? Yes! I had to make it immediately.

And then I made another batch.

Doubled.

I love bread.

 At the core of this bread recipe is the dough-handling technique that yields a beautiful, soft, smooth roll. After the dough reaches the correct consistency, it is pulled, gathered, and pinched, and then rolled gently to a smooth round ball.

Reaching the correct dough consistency can be tricky. I started by adding the flour in small increments of about a third to half of a cup at a time. I made sure that these additions were incorporated completely before adding more flour. So after the mixer had done most of the job, I stopped the paddle or hook, and scraped down the sides and bottom of the bowl so that every bit of loose flour could be incorporated before moving on.

Once I got close to the recommended amount of flour, I began to check the dough’s consistency. This part is very important. If the dough is too sticky or too dry, it will create different textures of buns. I checked the dough by lightly poking or pinching it.

Does the dough completely envelop your fingers, and won’t let go? Keep adding flour.

Does the dough simply indent, and almost repel your finger? There may be too much flour. Add a little water, a teaspoon at a time and try checking again.

Does the dough stick to your finger slightly, and then release? Perfect! This dough is slightly sticky, but it will remain manageable overall.

Next is the technique I used to form the rolls. First, pull off a section of dough. My sections were smaller than a tennis ball, and larger than a golf ball. You can make your rolls as large or small as you like, just remember that if they’re too big, the heat may not permeate to the center, and you’ll end up with raw dough in the middle. Too small, and they could become crusty and dry very quickly.

Then, using both thumbs, I gently swiped the dough from the top of the ball to the bottom, and continued around the ball. It’s as if I were moving dough from the North Pole to Antarctica, working around the globe in different longitudes, while gathering and pinching everything off at Antarctica. I ended up with a completely smooth surface on top, and a gathered pinch of dough at the bottom of the ball.

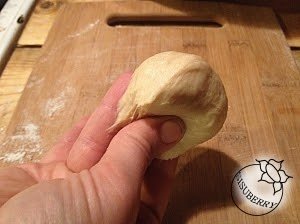
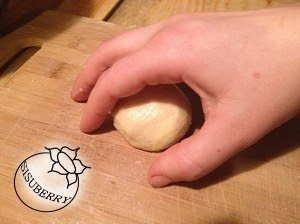
Then, on a very lightly floured surface, form a cage with your hand, and trap your roll underneath. Then lightly roll the dough along the surface, making contact with your fingers, and the top pad of your palm. This process smooths out the pinched area of your roll, and ensures that the dough will have a smooth, even top layer.

This is really where your dough’s consistency will play a large role. If your dough is too sticky, it will turn out to be a lumpy roll (or you can just call it “rustic”). Or, if your dough has too much flour, your roll will end up very dense and appear folded or creased together.

I really enjoyed making this recipe, and I hope you do, too! With all the resting time used in this recipe, it allows you time to attend to the rest of your cooking, so it is great to add to your regular dinner routines. It is a very versatile bread recipe that you can tweak to suit your tastes, and it only takes an hour to make!

Happy baking!

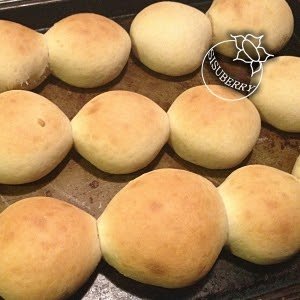
ONE HOUR DINNER ROLLS

Adapted from This Recipe from What is on Your Menu This Week

Yield about 24 dinner rolls

INGREDIENTS

1 cup of warm water

3 Tablespoons granulated sugar

1/3 cup oil (I used coconut oil, which will be liquid above 77°F. I just set it above my pilot light to heat it up slightly)

2 Tablespoons yeast

1 1/2 tsp salt

1 egg, slightly beaten

3 1/3 cup all-purpose flour

PROCEDURE

  1. In the bowl of a stand mixer, gently mix the warm water, sugar, oil, and yeast together.
  2. Let this mixture stand for about 15 minutes until bubbly. This is also called “proofing” the yeast. It is waking these tiny organisms from their dormancy so they can consume the sugar, exude carbon dioxide, and make our rolls rise.
  3. Sir in the salt and beaten egg.
  4. Gradually add in flour. I did this in stages of about 1/3 to 1/2 cup at a time. Ensure that all flour has been incorporated before adding more. You want the dough to be slightly sticky, but manageable. See my description above.
  5. When desired consistency has been achieved, let the dough rest in the bowl for 10 minutes.
  6. Form dough into balls. You can oil your hands first, but I found that it was easier without it. See a detailed description of this technique above.
  7. Place evenly apart on baking sheet so they are not touching. I prefer rolls that are completely separated from one another, but you may like them to stick together, and tear them apart. They will expand slightly in the next rise, and again in the oven, so adjust according to your preferences.
  8. Let rise for 20 minutes. Meanwhile, preheat your oven to 375°F.
  9. Bake for 10 minutes, or until lightly golden brown on top. When tapped, they should have a slightly hollow sound.
  10. Enjoy!

Thick and Fudgy Chocolate Brownies

Chocolate is amazing. It’s an ultimate comfort food that nearly everyone supremely enjoys. And one of the greatest pleasures in life is a warm tray of brownies.

I think every person should have a go-to recipe for brownies. A recipe that can be whipped up quickly at the last-minute before you run out the door. A recipe that is easy to modify to fit a specific occasion or dietary restriction. This particular recipe is one that I have been using for years. When I say years, I mean nearly a decade. This recipe is that awesome! This recipe always turns out better than those boxes of brownie mix. They come out thick and fudgy, warm and comforting. Exactly what I want out of a brownie.

Sure, those box mixes may seem easier. You just have to open a box and mix in a few things, right? But is it really easier than pulling a few extra things out of your pantry to begin with? On top of that, you’re actually paying for the perceived convenience in other ways. When you use boxed brownies, you’re sacrificing taste, texture, and possibly your health. Plus, I love the look on people’s faces when I tell them my brownies are homemade from scratch!

When you make brownies, or any other baked goods from a box, you are at the mercy of the company’s ingredient list. You have no control over the main ingredients of the brownies, and you can only vary the fat, egg, or water content. I’ve heard of some people using applesauce, or yogurt in an attempt to make their boxed baked goods “healthier”, but they still were bound to the flour, sugar, and preservative content of that darn box.

Boxed brownies, cakes, and cookies are loaded with preservatives in order to keep them viable on the grocery shelves, in your pantry, and beyond. And artificial sugars, hyper-processed flours, and unpronounceable ingredients are never a good addition to my family’s diet.

So when these brownies come out of the oven, and you taste them for the first time, you will forget all about those silly boxes.

Here’s how you can make them, too.

CHOCOLATE BROWNIES

Prep Time: 5 minutes Bake Time: 25 minutes

Total Preparation Time: 30 minutes

Makes 16 squares from an 8×8 pan

INGREDIENTS:

1/2 cup melted butter

1/2 cup unsweetened cocoa powder

1 cup granulated sugar

2 large eggs

1 tablespoon vanilla extract

1/2 cup all-purpose flour

1/2 tsp fine salt

PROCEDURE:

1. Preheat your oven to 350°F, and grease a glass 8×8 pan with a little oil (I used coconut oil).

2. Whisk together the melted butter and cocoa powder until the cocoa powder has been dissolved.

3. Add the sugar, and mix well

4. Add in the eggs, mixing until completely combined.

5. Add the vanilla extract and salt and mix well.

6. Gently add in the flour, and stir until just incorporated. It’s okay if you still see a few lumps of unmixed flour, as you really don’t want to over-mix the batter at this point.

7. Transfer batter to prepared pan, and bake for 20-25 minutes.

Note: It’s important not to over-mix or over-bake. Over-mixing will produce too much gluten, and make your brownies tough and chewy. Over baking will give you a dry, crumbly, or crunchy brownie.

If you want to add anything to the brownies (nuts, chocolate or butterscotch chips, m&m’s, etc.) limit the amount to 1/2-1 cup, or you’ll end up with a crumbly mess. (Remember not to over-mix!) You can also sprinkle your additions over the top after the batter has been made and set in the pan.

My family and friends have loved this recipe for nearly a decade, and I know yours will, too!

Clean and Simple Mayonnaise

I love salads.

Okay, let me rephrase that: I love pasta salad. And I love tuna salad, and chicken salad, and potato salad. Well, you get the idea.

You know one thing they all have in common? Mayonnaise.

All my “salad” recipes call for mayonnaise. It has a creamy goodness that is hard to replicate, and it’s an emulsion that helps give smoothness and stability to any sauce.

I was totally craving a tuna salad sandwich the other day. Crispy, crunchy bread, and creamy tuna. And I always try to sneak vegetables in wherever I can, so I usually add in celery and tangy fermented pickles.

But to my horror, there was only a tablespoon of mayonnaise left in my fridge. (Who leaves a tablespoon in a jar?).

Living in the rural Northwoods as we do, it’s difficult to find mayonnaise that meets my criteria. For example, I don’t like to buy anything with canola oil, which is mostly genetically modified.

And have you heard of calcium disodium EDTA? It’s a preservative added to just about every single store bought mayonnaise on the shelves today.

EDTA can be used as a medication for chelation therapy, or for people with lead poisoning. But side effects can include exacerbation of asthma, seizures, diabetes, along with worsening of heart rhythm, liver, and kidney problems.

It’s also a persistent organic pollutant. Yikes.

I’d rather not consume anything like that, and serving it to my family is right out.

Luckily, I keep all the ingredients to make my own mayonnaise on hand — and you probably do, too!

Simple ingredients, and a little spinning: et voilà! You have a batch of mayonnaise that costs a fraction of the price, and you didn’t even need to make a trip to the store!

I like to use my mini food processor. It’s a lot like this one. It’s the perfect size for this batch of mayonnaise, and it has small holes in the lid that are the perfect size for drizzling, which aides greatly in the emulsification process.

But I figure not everyone is going to have a mini food processor on hand.

So I tried making a batch in my blender-and it worked! My blender has a hole in the lid at the top for pouring, but I used it to slowly pour in the oil.

Adding the oil slowly is a key method to creating the emulsion that makes the mayonnaise so thick and creamy. Make sure you have a way to (safely) add the oil slowly.

So here you go: Mayonnaise with simple ingredients, in a blender in less than ten minutes!

Mayonnaise

Makes about a cup and a half

INGREDIENTS:

1 large egg, room temperature

½ tsp ground mustard

½ tsp finely ground salt

2 pinches sugar

1 tablespoon white wine vinegar

2 tsp lemon juice

1 cup oil, I like to use safflower

PROCEDURE:

  • In a small bowl, combine the lemon juice and vinegar. Set aside.
  • In the jar of your blender, add the egg, mustard, salt, and sugar. Give it a few pulses to mix it together.
  • Add half of the lemon juice/vinegar mixture. Give a few more pulses to mix thoroughly.
  • Through the hole in the lid, add a small amount of the oil, about two tablespoons at first. Blend on a low speed until the mixture gets lighter in color, about 15 seconds.
  • Set the blender to a medium-high speed, and drizzle the oil in a thin stream at a very slow speed until it is half gone.
  • At this point you may see that the mixture has already started to stiffen; great! You’ve got an emulsion going! If you still see a liquid, don’t worry, I’ve still gotten properly emulsified mayonnaise at this stage. Spin it in the blender on high for a minute or two without adding any more oil.
  • Add in the remaining lemon and vinegar, and keep blending, and slowly adding the remaining oil.
  • Scoop out your mayonnaise, and dollop on your favorite sandwich, or salad!

There you have it: mayonnaise from your own pantry, with real ingredients, in under ten minutes, for a fraction of the cost from the store!

What’s your favorite way to use mayo? Do you have a go-to “salad” recipe, too? Let me know in the comments below!

Baked Carrot French Fries

Carrot french fries.

Yes, you read that right! I am so excited to share this recipe today!

My kids, like every kid in history, really enjoy eating some less-than-healthy foods, and tend to be pickier about eating the good-for-you foods. And I, like every parent in history, get concerned about my children’s diet, and if they are getting enough vitamins.

Enter: Baked Carrot French Fries!

These fries bake in the oven, and come out crispy, flavorful, and best of all; my kids love to eat them! I got my kids to love a vegetable! (parenthood award!).

These Carrot French Fries are easy to make-just cut, toss, and bake. No hot oil, no deep fryer appliances, just great tasting veggies!

While preheating the oven, I started washing and cutting up about a pound and a half of organic orange carrots. Now, this is the only tricky part in this recipe, because these suckers roll.

Use a fork to keep your digits safe!

I found that you can steady the carrot, and keep your fingers out of the danger zone, by piercing the carrot with a fork, and then cutting the carrot. Brilliant! Keep those fingers safe!

I cut these carrots into matchstick size: about two inches long, and about a quarter inch in diameter. After slicing in half, I cut them into thirds.

Once all the carrots are cut, toss them in a bowl with a little oil, and spices. I used safflower oil, salt, pepper, garlic, and smoked paprika. Safflower has a high smoke point, and a very neutral taste that lets the carrots and paprika shine.

You can really experiment with some exciting flavors here; what about coconut oil and cinnamon?! Sesame oil and garam masala?! Smoked chipotle?! MMM! Let your imagination run wild!

Then, arrange all the carrots on a large sheet pan. I used a half-size sheet pan for this. It’s very important to not overcrowd these carrots, or they won’t crisp up. I tried making a larger batch, but they ended up kind of soggy. Leave them space on a large sheet pan, or use two smaller pans.

Bake in the hot oven for about fifteen minutes, then flip the carrots to roast evenly. You’ll see some really pretty browning on the bottom, but don’t eat them just yet! Resist the temptation! Toss them around, and arrange again so there’s plenty of room for all the carrots to bake.

Give them another five to seven minutes, depending on your oven, and desired level of crispiness. Then let them sit. Don’t dive in just yet! Patience will pay off! They will seem slightly floppy when they first come out of the oven, but if you can let them sit on the tray for a few minutes, they will start to dry and turn crispy.

Yum!

BAKED CARROT FRENCH FRIES

Serves 2

INGREDIENTS:

1 to 1 1/2 pounds carrots, cut into matchsticks

2 tablespoons oil

1/2 tsp salt

dash pepper

1/2 tsp garlic powder

1/2 tsp smoked paprika

  1. Preheat oven to 400°F.
  2. In a medium bowl, toss carrots in oil to coat.
  3. Sprinkle in seasonings, and toss until evenly coated.
  4. Spread carrots on a single layer in a large sheet pan. Ensure they aren’t touching each other too much, as that will impede their crisping.
  5. Bake in oven for 15 minutes.
  6. Flip carrots and bake and additional 5-7 minutes.
  7. Let sit 5 minutes until cooled and crisp.

Thanks so much for checking out this recipe! I hope it gets your kids (or you) to eat more veggies!

What combos would you use for your carrot french fries? Let me know in the comments below!

Switchel: Nourish and Hydrate!

On the North shore, we don’t get as hot as other spots. There isn’t an urban heat bubble that occurs in larger cities, and we get a nice breeze off the lake that keeps us relatively cool. But lately, we’ve been having high heat with a bunch of humidity, and that equals one cranky mama!

I’ve been attempting to keep myself (and the family) hydrated, but it’s hard to keep up. On top of that, drinking so much plain water is getting monotonous. Ugh, it’s boring!

I could easily reach for a ‘water enhancer’, or a ‘sports drink’. But both are terrible options for your health. Both contain a ton of sugar, or worse artificial sweeteners. If you consume sports drinks after exercising, you’re likely to drink more calories than you burned off! Neither of which are good for you if you are trying to stay hydrated. Sports drinks are actually worse for your teeth than soda, and water enhancers commonly include the chemical propolyne glycol, which is also used in antifreeze and deicers. I work very hard to keep chemicals like this out of my family’s diet, and the thought of guzzling it down just to avoid water sends shivers down my spine.

I want to keep my family from becoming dehydrated, but I’m sick of hounding them about water!

So I turned to an old folk beverage that I learned about a few years ago: Switchel.

Also called ‘Haymaker’s Punch’, Switchel is a natural electrolyte beverage, which helps maintain normal water balance and distribution in the body. It is said that farm workers used to drink after raking and baling up hay in the hot sun.

It is usually made with vinegar, ginger, a mild sweetener, and water. After tinkering with the ratios, and testing it out on my family, friends, and at the local farmer’s market, and I think I’ve found an excellent recipe to share with you today!

My version of Switchel contains apple cider vinegar, lemon juice, honey, ginger, turmeric, and cinnamon. All of these ingredients alone are major health powerhouses, and when you combine them all together–wham! You get a tasty, nourishing, hydrating drink that you can feel good about giving to your family! Woohoo!

Apple cider vinegar (ACV) has long been touted for its health benefits. Its use even dates back to Hippocrates, the father of modern medicine. ACV has been shown to be beneficial in reducing blood pressure, and reducing acid reflux, and other digestive ailments, as well as having antiglycemic properties, even for people with diabetes.

Many people are turned off by the flavor of vinegar. It can be overpowering, and the rest of the flavors don’t come through. My solution to this was to add lemon juice. This turned the tart, sour flavor into something more akin to lemonade, and it quickly became more palatable.

Ultimately, I did have to add some sweetness to the drink. I found that honey was the best option for my Switchel. Some other sweeteners that are used are molasses, maple syrup, and brown sugar. Molasses wasn’t sweet enough, and the flavor was a little jarring. Maple syrup didn’t blend well with the other ingredients. Brown sugar and regular organic sugar tasted fine, but I didn’t want to be adding so much sugar without the benefits. So I choose to use raw, organic, local honey in my Switchel. It works the best with the rest of the flavors, and it comes with a whole host of health benefits on its own.

Most honey that you buy at a grocery store has been heated, filtered, and/or pasteurized. In doing this, the natural antioxidants, vitamins, and enzymes are destroyed. Raw honey is honey in its natural form, and it has many health benefits. Local honey can improve seasonal allergy symptoms. Raw honey contains antioxidants, and is the perfect workout fuel, as it contains both carbohydrates and sugar to keep you going. This is a seriously good-for-you food, and it is perfect in conjunction with the rest of my Switchel ingredients.

Ginger is the next ingredient in Switchel. According to Dr. Singletary: “Ginger has been a part of healing strategies in Asia, India, Europe, and the Middle East for centuries for treatment of such disorders as arthritis, stomach upset, asthma, diabetes, and menstrual irregularities, to name a few.” Ginger is great for all things tummy related: it has phenolic compounds which relieve digestive problems, it’s great for combating nausea, and it helps reduce inflammation as well. No wonder my mother always gave it to us kids when we had tummy aches!

Fresh ginger will have the best flavor, and the best potency. However, when  I tried using fresh grated ginger in my Switchel I was not a fan of the chunks. They floated to the top, and it was difficult to get them evenly dispersed through the liquid. I have substituted organic ginger powder in my Switchel, and I have loved the results.

I have used turmeric in many dinners, but this is the first time that I have used it in a beverage. I love putting this spice in everything, because it has great anti-inflammatory properties for your gut, and also for your joints. It even can alleviate tooth pain, and provide relief for gingivitis and periodontitis.

A touch of cinnamon rounds out the beautiful flavors in this drink. Marrying cinnamon with ginger and apple is always a winning combination. But it also is really good for you! It gives the Switchel another kick of antioxidants, and it is another ingredient that is good for your gut. Cinnamon has been used as an antiemetic, antidiarrheal, and antiflatulent. Lately, if I start experiencing indigestion, or an overall stomach upset, I take a cinnamon supplement and my symptoms disappear!

With all the incredible health benefits of this drink, I am going to be making it all year round, not just when it’s hot outside. Here’s the recipe so you can give it a try, too.

Switchel Recipe

Makes a half gallon

In a half gallon jar, mix together:

½ cup Apple Cider Vinegar

⅓ – ½ cup raw, organic, local honey

½ cup lemon juice

1 tsp ground ginger

¼ tsp ground turmeric

Pinch cinnamon

Shake vigorously to combine, and dissolve the honey.

Then fill the remainder of the jar with water.

Shake before each serving, as the spices will fall to the bottom.

I hope you give Switchel a try! I am so happy to have an alternative to sports drinks and water enhancers that is actually good for the body! What other beverages to you drink to stay hydrated? Let me know, and then let me know what you think of Switchel!

Disclaimer: I am not a doctor. This is what works for my family, and our own health needs. Please consult your doctor or healthcare practitioner before starting any vitamin or supplement regimen.